
Figma is the most popular tool for creating websites, mobile applications and various interfaces. It’s necessary to export elements from Figma and add them to the layout when coding. The exporting process may differ depending on whether it’s a single image, a group or a vector. However, exporting can be completed in just a few clicks regardless of the selected options.
So why should you read this article if exporting is so easy? I have an answer. Usually, problems can arise when choosing the proper format and resolution for exporting files. That’s why the live website can look different in Figma.

Figma design vs the live website
So let’s learn how to export files from Figma without losing nerves and quality (video instructions are attached). I will also share my secret tips that will improve your exporting experience. Just promise me to share the post with your friends if you find them useful.
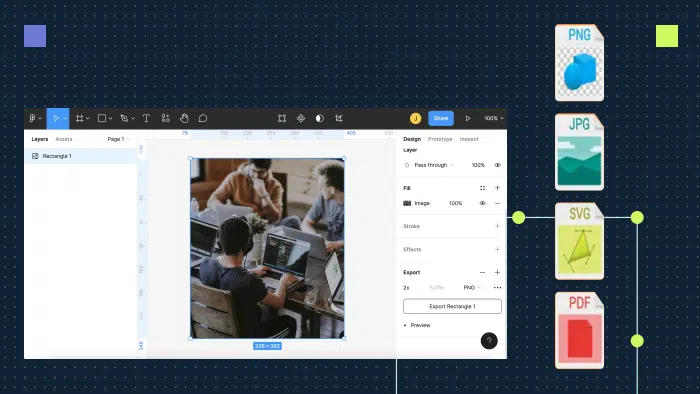
Export formats
Let’s discuss the formats of images that Figma supports by default.
JPG
JPG (Joint Photographic Experts Group) is a format for storing raster images with a color depth of 24 bits JPG is a popular format for both web developers and designers. It saves photos, images, ready-made website layouts and much more in a small weight.
- For exporting, first, select the image.
- Then, go to the right settings section and scroll to the bottom to the Export mode.
- Click on the plus sign and choose the desired option.
- By clicking on the Preview you can check to see if the image is selected properly. If the picture in preview mode is not how you want it to appear, revert to the first step and make sure you selected the correct layer.
- To save an element to your computer, click on the Export button.
Useful tip #1: if you need to export a couple of elements at the same time, select all of them while pressing the Shift button.
Congratulations, we have exported our first image. Let’s check it on the live website.

Oops, something is wrong
Wait, do you see the white background? We made the first common mistake— using the wrong image format. JPG only works for images that have a simple rectangle shape. But, what if our image is round? Let’s find out which export option to choose next.
PNG
PNG (Portable Network Graphics) refers to the format for storing bitmap images like JPG. The PNG 24 algorithm compresses images without losing quality but it may take up more space. JPG is best for photos and images with lots of colors and gradients. PNG is best for drawings, diagrams, icons and logos. It works for images that have irregular shapes, rounded corners or images that don’t have a background at all. Also, PNG format is used for images with shadows. The export instruction on Figma is the same process as the JPG export process. Just select PNG instead.

After selecting PNG, I’m happy with the live results. The image doesn’t include a white background.
Useful tip #2: Want to share the image without saving it to your computer? Select the image, right-click and Copy/Paste as – Copy as PNG. Voila! Your image is in the clipboard and you can easily paste it (Ctrl+V) into any document, messenger etc.

How to share the image from Figma without exporting
Next, let’s export circles and dots at the back using the PNG instructions, and check the live website.

Compare the design in Figma on the left vs the live website on the right
Do you see how the small circles on the right became blurry? This is the second common mistake. Dots and circles are created in vector format. Now you’re probably wondering how to know when there is a vector image and how to export vector files properly. That’s up next.
SVG
SVG (Scalable Vector Graphics) stands for a vector image that unlike raster images can be scaled without loss of quality. SVG is the format used by designers and developers for exporting vectors. If you enlarge a JPG or PNG, the pixelated grain will appear. This does not happen with the SVGs. Vectors do not contain pixels. Circles, triangles, rectangles, dots, arrows, lines or any other colored or stroked elements created by Pen or Shape tools are vectors. Logos, icons and illustrations also mainly consist of vectors. The benefit of using SVG is that a picture will keep the right size on different devices without losing quality. It is especially effective in exporting small icons.
Useful tip #3: Figma exports text in form of glyphs by default, so you can’t edit the file in another program. To keep the editing functionality, press the three dots and uncheck the Outline text option.

How to keep editing mode for text in SVG file
Useful tip #4: Figma doesn’t support exporting blurs in SVG. In this case, you should export the element in the PNG format.
PDF (Portable Document Format) stands for an accurate display of printed products in electronic form. It is commonly used for various documentation. PDF format helps to export e-books, whitepapers, case studies, solution briefs, marketing kits, etc. You can’t edit the text in the exported file, but you still can select and copy the typed text and leave comments in the layout. PDF documents have a large weight, but vector objects are saved with high accuracy on any scale, so PDF can be used in printing.
Useful tip #5: you can create great presentations thanks to this kind of export. Figma has more design possibilities than Google slides and Keynote. Create full HD frames 1920×1080 px, export them in PDF and open slide show in Adobe PDF instrument.
Useful tip #6: if you want to export the whole document in one PDF file, place all needed frames in the separate document and press File – Export frames to PDF. In this case, nothing needs to be selected. All the frames in your project will be exported and put in a single file.

Instruction on how to export a single PDF file in Figma
Export to PSD
PSD (Photoshop Document ) is a raster format for storing graphics using compression without quality losses, created specifically for Adobe Photoshop. Exporting to PSD is the transfer of the project to the Photoshop program. Since Photoshop is a more complicated program, there is no proper import-export option. You can try exporting to SVG and then importing to Photoshop. Some elements may work correctly, but the whole image may look bad.

Export to PSD is not possible in Figma.
Export to FIG source file
FIG (Figma) is an internal file for graphics storage created by Figma company. FIG file is not commonly used because Figma is a cloud program. All changes are saved automatically, and even when something is wrong with the connection, the file will be updated during the next Internet session. This kind of export is useful only when you work in offline mode.
To export the file to the desktop in the *.fig extension, click on the File tab at the top right and select Save a local copy. A FIG file can be uploaded to Figma by opening your Drafts and dragging it to the rest of your projects. There is also an Import icon at the top left.

Instruction on how to export to FIG in Figma
Export to HTML
HTML stands for hypertext markup language. It is needed to place text, pictures, tables and videos on a web page. The browser loads an HTML file with information about the structure and content of the web page when you open a website. HTML builds the visual foundation of the site.
Exporting to HTML is not available in Figma, but coders can use the CSS section to view hints in the form of properties of each object. Select a specific frame or element, go to Inspect tab at the top right and view its code. There, you will see options for iOS and Android development.

HTML properties in Figma
Useful tip #7: Figma has a bunch of external plugins that will help you to export your frames to HTML. Some of them have limitations, and some are paid. Search in the Plugin tab in Community to learn more.

Figma plugins for HTML export
Export a section of the screen
If you want to export a part of your project (similar to a screenshot tool but in high quality), use the Slice tool.
- Press hotkey S or Knife instrument at the top left
- Select the area.
- Export the area to PNG using the Export panel.
- The Slice exports all the content visible inside its borders, regardless of whether it is above or below it in the layer tree.
Secret export tips
We talked about the main export Figma features. It’s time to go through useful life hacks that will improve your exporting experience.

Exporting may be complicated, so these life hacks will help you to deal with that
Group and rename layers before exporting
Quite often, an image consists of several layers. Some of them can be vectors and some are photos or images. Let’s look at the Productive Shop homepage banner. If we use the Shift button to select three photos and background elements as in the instructions above, we will get four separate images exported. But, that is not what we need.

Wrong group export example
Before exporting we should combine our layers into one single group with CTRL+G. Look at the example below, Preview mode shows that our image will be saved correctly.
Also, don’t forget to rename the group. Naming is needed for proper upload to the website admin. Every image should be named by Alt-tag description. From an SEO perspective, including a name can help users find your images in a Google search and it can help rank your website above the competitors.

Correct group export example
Saving to folders
Sometimes we need to save images in separate folders like when you export a lot of assets at once or for other development purposes. Figma allows folder saving t in a couple of clicks. Just rename your layers according to the following template: folder_name/image_name, for example, images/homepage_banner.
In the example below, the image will be exported to the Images folder with the name Homepage_banner.

On the left side, you see that all assets will be separated into 3 folders after exporting: Images, Buttons and Text
Scale
You can control the export scale in the Figma export settings. 1x is the actual size of the asset, this means that your project will be saved on a one-to-one ratio. If you set the value to 0.5x for a layout with the size 1920 x 1000 px, then the scale of the saved file will be half as much (960 x 500 px). Similarly, if the scale is set to 2x, the object will double in size. .

Where to find the scale suffix in Figma

Scales in Figma: 0,5x, 1x, 2x and 3x
Useful tip #8: Did you hear about the retina display? In 2010 Apple achieved such a quality that the human eye didn’t distinguish between individual pixels. Halftones appeared and there was no graininess in the pictures. Now, screens with increased pixel density are produced by nearly all major brands.
But why do we need to know that while exporting? Because it’s important to save all PNG and JPG images in 2x scale, if not, your images will look blurry on the live websites.
Alt tag: 1x and 2x scale difference.
Visible description: Compare 2x good quality on the left, and blurry 1x on the right.
Resize images
Your website ranking in Google search depends on the speed of the web pages. If you upload images right after exporting from Figma, they will have a big weight for sure. So don’t forget to compress the images. For example, you can use Tinypng website for resizing.

Compare 2x good quality on the left, and blurry 1x on the right
Let’s wrap up
Figma is a handy tool for exporting any graphics from a working template, including vectors in SVG format. JPGs and PNGs are used for images. JPG images create a smaller file size but the quality is worse. PNG is used for transparent and blurry imagery and has better image quality which is why it is the main file type used for websites. SVG can be used for exporting vectors for development and for opening files in other editors like Photoshop. Exporting in PDF is ideal for ebooks, presentations, reports and printing material.
I hope the post was useful for you. If you have any questions don’t hesitate to contact Productive shop. Our design team will help you to create amazing designs as well as export them properly.