Businesses rely heavily on data to make informed decisions and stay ahead of the competition. From customer behavior to website analytics, having access to accurate and comprehensive data is crucial for businesses of all sizes.
In this blog post, I’ll explain how you can effectively connect ZoomInfo to GA4 and Looker Studio to unlock a wealth of data insights. We’ll start by discussing the benefits of ZoomInfo and its integration with GA4.
What is ZoomInfo?
ZoomInfo is one of the most widely used tools for sales prospecting. It provides contact, company and other useful firmographic and ICP-relevant info. It can be useful for B2B SaaS companies as it helps them to identify potential customers, track customer behavior and gain a deeper understanding of their target audience, ultimately leading to more effective marketing and sales strategies.
However, while ZoomInfo provides valuable insights, it can be difficult to connect this data to other platforms, such as Google Analytics 4 (GA4) and Looker Studio (formerly known as Data Studio).
Steps to connect ZoomInfo with GA4
Step 1: Map ZoomInfo fields to Google Analytics 4:
You will have to connect ZoomInfo fields to GA4 dimensions on both sides. The way to do this is to go into the section of your website and map the ZoomInfo fields to GA4. Check the following image to know where to do this:
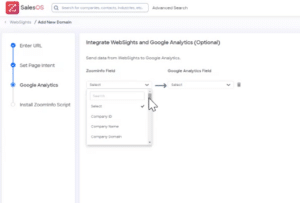
Make sure to use “dimension1”, “dimension2” etc for the Google Analytics side — these dimensions are event categories set inside GA4. The characters cannot be spaced out and have to be lowercase. This is a change from the previous way the connection worked with Universal Analytics.
What ZoomInfo fields can you use in Google Analytics 4?
You can only send the following fields to Analytics (as of April 21, 2023), and they should be mapped to their counterpart dimensions:
| Zoominfo Field | Google Analytics 4 dimension |
|---|---|
| Company ID | dimension1 |
| Company Name | dimension2 |
| Company Domain | dimension3 |
| Company Type | dimension4 |
| Company Revenue | dimension5 |
| Company Revenue Range | dimension6 |
| Company Employee Count | dimension7 |
| Company Employee Range | dimension8 |
| Company Primary Industry | dimension9 |
| Company Industries | dimension10 |
| Company Business Model | dimension11 |
| Company City | dimension12 |
| Company Country | dimension13 |
| Company State | dimension14 |
| Company Zip | dimension15 |
Step 2: Map Google Analytics 4 dimensions to ZoomInfo fields:
The process to connect Zoominfo to GA4 involves creating custom definitions inside GA4. Using these definitions, you can then create a dashboard that is mapped to ZoomInfo fields so you can see engagement data for each field.
You can do this by going to the Custom Definitions section inside your Admin of GA4:
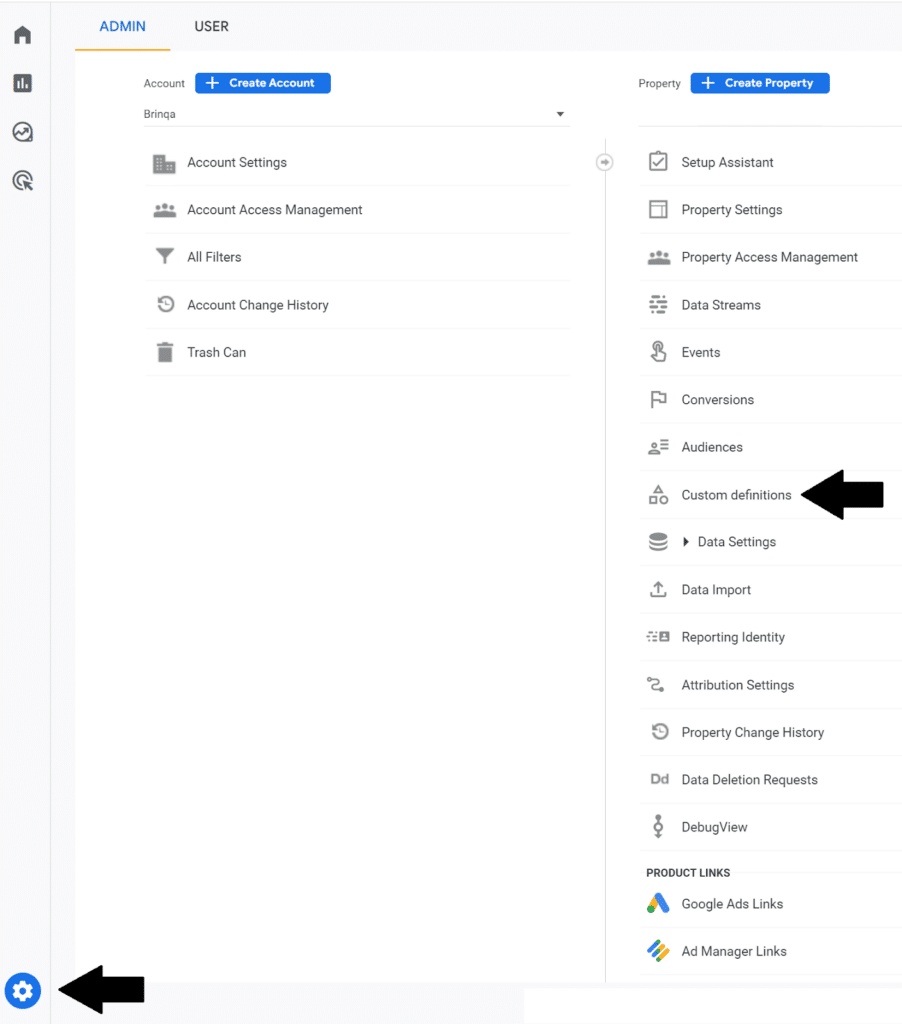
Within custom definitions, you should set up your dimensions using the form there. Put the ZoomInfo fields inside the “Dimension Name” (e.g., “Company Name”). In Event Parameter, put the GA4 dimension (i.e., “dimension1”). You can choose to add any description you want. Only the scope field and the GA4 parameter are strict. Make sure you save it as an “event.”
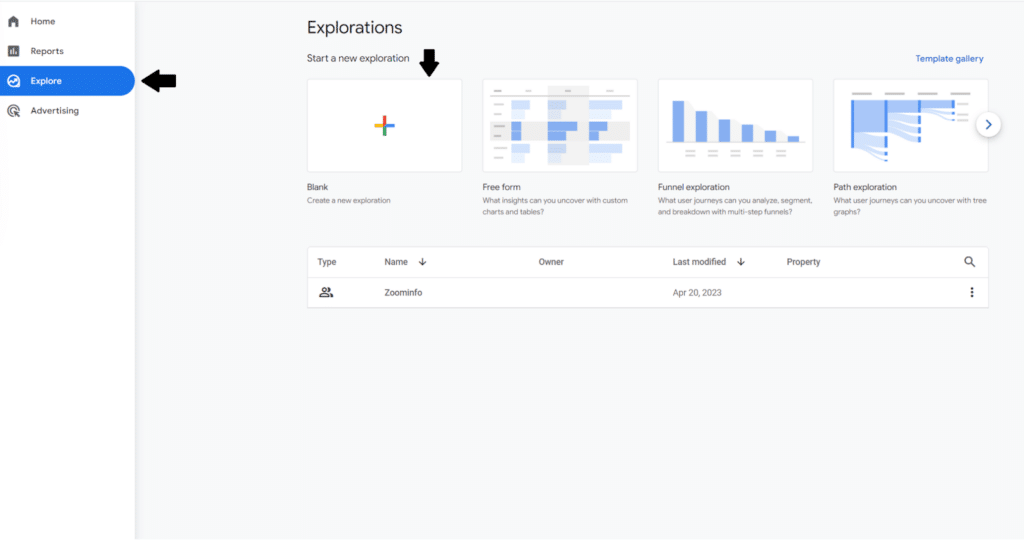
Step 3: Create a GA4 dashboard for ZoomInfo
Go to the exploration section in GA4 and create a blank exploration, as seen below:
You can then add your ZoomInfo fields to the dimension side and your GA4 metrics to the section below. However, you will then again have to add them to the following right sections as shown below:

If some ZoomInfo fields appear to be missing in this GA4 dashboard, you might have the rows limited to 10. You can increase this to a bigger range (as shown above) and see more data.
How can you connect ZoomInfo with Looker Studio?
Since a direct connection is not offered inside looker studio, you can either try to pull this data using custom formulas inside Looker Studio or use the manual method and export all your 15-day or 30-day data to one Google Sheet that you then pull via Source inside Looker Studio. We recommend the latter.
Upload your data to a Google Sheet, and then on your top bar for Looker Studio go to Resource -> Manage Data Sources -> Add a data source. Here you can select Google Sheets and then enter your exact sheet URL to make it show as a table inside the Looker Report.
We will update this blog post based on new information as a connection appears.
Bonus: Insert Zoominfo Code to the website with GTM:
- Log in to your Google Tag Manager account.
- Create a new tag by clicking on the “Tags” option in the left sidebar and then clicking on the “New” button in the top right corner.
- Name the tag “ZoomInfo Script”.
- Click on the “Tag Configuration” box and select “Custom HTML” from the list of tag types.
- In another browser tab, log in to your ZoomInfo account and navigate to the “Tracking Code” section in the “Settings” menu.
- Copy the entire ZoomInfo tracking code.
- Go back to the Google Tag Manager tab and paste the ZoomInfo tracking code into the “Custom HTML” box.
- Click on the “Triggering” box and select the appropriate trigger(s) for your ZoomInfo script. This will depend on when you want the script to fire. For example, you might choose to trigger the script on all pages of your website.
- Click on the “Save” button to save your tag.
- Click on the “Submit” button in the top right corner of the Google Tag Manager interface to publish your changes to your website.
Your ZoomInfo script should now be successfully implemented with Google Tag Manager.
What are the advantages and disadvantages of implementing ZoomInfo Script with Google Tag Manager than with GA?
Both options have their own advantages and disadvantages depending on your specific needs and goals. However, using Google Tag Manager to implement ZoomInfo Script can offer several benefits, such as:
- Centralized management: Google Tag Manager provides a centralized platform for managing multiple tracking scripts and tags, making it easier to implement and maintain a variety of tracking tools across your website.
- Flexible trigger options: With Google Tag Manager, you can set up triggers for when the ZoomInfo script should fire, such as on specific pages or when certain user actions are taken. This level of flexibility can help ensure that the script is only firing when it’s supposed to, reducing the risk of errors or negative impacts on website performance.
- Version control: Google Tag Manager allows you to maintain a history of changes to your tags and scripts, making it easier to revert back to a previous version if necessary.
- Customization options: Google Tag Manager provides options for customizing how the ZoomInfo script is implemented, such as adding additional code or modifying the script to suit your specific needs.
Ultimately, whether it’s better to implement ZoomInfo Script with Google Tag Manager or GA4 will depend on your specific circumstances and goals. It’s important to evaluate the pros and cons of each option and choose the one that best fits your needs.
What are a few potential pitfalls to watch out for while implementing ZoomInfo script with Google Tag Manager?
- Ensuring the correct trigger(s) are set up: It’s important to make sure that the ZoomInfo script is triggered at the appropriate times. If the trigger(s) are not set up correctly, the script may not fire when you want it to or may fire too often, which could impact website performance.
- Proper formatting of the ZoomInfo script: The ZoomInfo script should be copied and pasted into the “Custom HTML” box exactly as it appears in your ZoomInfo account. If the script is not formatted correctly, it may not work properly or may cause errors on your website.
- Testing and verification: It’s important to thoroughly test the implementation of the ZoomInfo script to ensure that it’s working as expected. This can include verifying that data is being collected correctly and that the script is not causing any issues on your website.
- Updating the script: If you make changes to the ZoomInfo script in your ZoomInfo account, you will need to update the script in Google Tag Manager as well to ensure that the most up-to-date version is being used.
By being mindful of these potential pitfalls and taking the necessary precautions, you can ensure a successful implementation of ZoomInfo script with Google Tag Manager.
FAQs
Is the ZoomInfo data that comes into GA4 reliable?
On our testing, it seems that GA4 is not connecting “bounce rates” accurately with ZoomInfo, which are now called Engagement Rates. You should compare your Google Analytics 4 data with your ZoomInfo data and see if there are any discrepancies. As GA4 is still in development and the connection is not seamless, we cannot guarantee that the data is fully accurate.
Does ZoomInfo offer direct integration with data studio (Looker Studio)?
ZoomInfo does not offer direct integration with Looker Studio. While it seems that such a connection may be in play, it is not offered as of today. Reach out to our team for help building custom Looker Studio reports.
What are the dimensions in Google Analytics, and can you rename them?
In Google Analytics 4, dimensions are attributes of data. If the Country is a dimension, the data for it would be France or Spain etc. If the dimension is Event Count, the number of events count would be the data associated with it.